Welcome as a user of minLedelse!
Introduction
minLedelse is a complete solution for the systematic registration, handling, and follow-up of deviations, incidents, and documentation. The solution is designed to provide managers and employees with a user-friendly and efficient tool for management and continuous improvement—directly within a workspace they are already familiar with: Microsoft Teams. The organization ensures full traceability, control, and learning.

The Deviation module is role-based and manages multiple actions per deviation. Feedback on implemented actions is automatic.
Deviation Management

minLedelse makes it easy for organizations to identify, assess, and manage risks and opportunities in a systematic way.
Risk and Opportunity (ROS) Analysis

Create digital checklists for various processes and projects.
Ensure that important tasks are always completed and documented.
Checklists

It is easy to set up process maps that reflect the workflows in your organization.
Process-Based

With a quality library and version control, all management system requirements are covered. Supports all requirements in ISO 9001, ISO 14001, ISO 45001, and ISO 27001.
ISO-Friendly

Seamless sharing, version history, multiple users editing simultaneously, and role-based access
Quality Library
Getting Started
minLedelse is a system you can use through Teams, and to add the app on your mobile device, follow these steps:
-
Open Teams on your mobile device.
-
Tap the three dots in the bottom right corner → More

4. Type in "minLedelse"
5. Tap "Add app"

3. Add app

You have now installed the app on your phone and are ready to start using minLedelse.

Description of Icons in the Solution

List: The icon appears under the Process menu option and is used to change the order of processes.

Plus: The icon appears under all menu options in the solution and is used whenever you want to add something new, whether it’s registering an incident, task, process, or adding a document, etc.

Filter: The icon appears under all menu options in the solution and is used for advanced filtering.

Quality Library: The icon appears where there are documents linked to a process. The number indicates how many documents are associated with the given process. Tapping the icon takes you directly to the list of documents.

Wrench: The icon appears under all menu options in the solution and is used for configuring fields and values.

Chart: The icon appears where there are flowcharts linked to a process. The number indicates how many flowcharts are associated with the given process. Tapping the icon takes you directly to the flowchart.

Recycle: Appears under all menu options in the solution. The icon is used to view deleted items.

Pen: This appears when you open an incident, a task, a checklist, during a Risk Analysis, and more. Tapping the pen opens editing options, allowing you to edit the selected item.

Checklist: The icon appears where there are associated checklists. A checklist can be linked to processes, deviations and incidents, Risk Analyses, and more. The number indicates how many checklists are associated with the given process or incident. Tapping the icon takes you directly to the list of checklists, allowing you to use the ones you need.
.png)
Column: The icon appears where there are associated incidents. An incident can be linked to processes, checklists, Risk Analyses, and more. The number indicates how many incidents are associated. Tapping the icon takes you directly to the list of all registered incidents, where you can continue managing them.

How to Use minLedelse?
When you open the app, you arrive at your overview screen. Here, you have full visibility of your registered incidents, your tasks, documents awaiting approval, and documents you need to confirm that you have read and understood.
1 Registering a New Incident:
By tapping the + icon, you can proceed to register a new incident. The + icon works the same way for Tasks as well.
2. Select Incident Type
Choose the type of incident you want to register.
Available options may vary from company to company.
Your selection determines which fields and requirements apply for completing the incident report.

3. Fill Out the Fields
Status shows where the incident is in the process.
You must complete the following:
-
Title: Provide a brief and precise description of the incident.
-
Department: Select the department the incident belongs to.
-
Location: Specify where the incident occurred.
-
Category: Choose the correct category for the incident.
-
Project: Indicate if the incident is linked to a project.
-
Description: Explain what happened, what actions were taken, and who discovered the incident.
-
Importance: Specify the severity of the incident.
Then tap "New Incident" to save the entry.


Menu Options in minLedelse
In the menu, you will find the following tabs:
-
Home
-
Processes
-
Quality
-
Incidents
-
Tasks
-
Checklist
-
Risk Assessments
-
Charts
Each tab provides access to its respective functions and overviews.

Processes
Get an overview of your processes and click the arrow on the right to see details for each individual process. To create a new process, click the + icon.


When creating a new process:
Give the process a name, add a description, and fill in details such as objectives, input, output requirements, and risks. You can also define roles: process owner, responsible party, executor, as well as who can be consulted and informed. Then tap "New Process" to create the process.
If you need additional or different types of fields than those available, these can also be added or removed.
How to Modify Fields:
Go back to the Processes menu and tap the wrench icon, highlighted with a red circle in the image below. This will take you to the configuration page.

Configuration: Be aware that changes here should be made with caution. We recommend consulting a consultant before proceeding.
Go to the field called "Fields". Here, you have the option to add new fields or modify/delete existing ones. Be careful when making changes, as it may be advisable to contact a consultant before making any modifications.

Quality
In the Quality menu, you will find all quality documents.
Here you get an overview of:
-
The status of each document
-
Date of last modification
-
Revision history
-
Document owner
Functions:
-
Use the search function to find specific documents
-
Apply filters to narrow down your search as needed
-
Add a new document by tapping the + icon (highlighted with a red square in the image below)

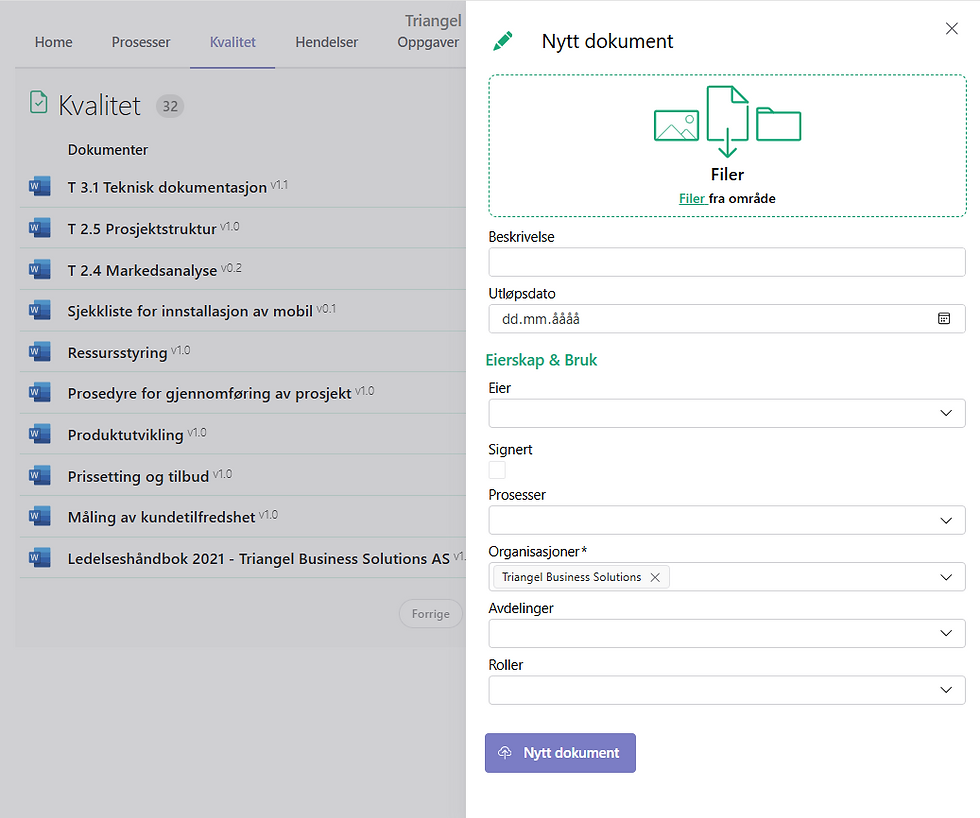
Adding New Documents:
You can upload documents using drag & drop or by selecting files from your library.
When creating a document, you must:
-
Enter a description
-
Set an expiration date
-
Define the document owner
-
(Optional) Sign the document upon upload
-
Specify which process(es) the document belongs to
-
Select the organization (if multiple exist in the system)
-
Link the document to the correct department and role
Completion:
Tap New Document to create the document. The document can then be submitted into any approval workflow in the system.
Document Signing:
To sign a document, click the box under Signature (highlighted with a red square in the image below). Once you sign, the document’s status is updated automatically.

Status:
Click on a document’s status to:
-
Submit the document for approval
-
View file history
-
View version control

File History
When you submit a document for approval, the recipient will see the document on their homepage with a notification that it needs to be approved.

View Who Has Signed the Document:
Here, you can see an overview of everyone who has signed the document.

View:
Summarizes the necessary information related to the document.

Incidents
In the Incidents menu, you will find all registered incidents along with their status and revision history.
Here you get an overview of:
-
The status of each incident
-
The type of incident registered
-
The ability to open and revise a specific incident
Functions:
-
Use the search function to find specific incidents
-
Apply advanced filters as needed
-
Create new incidents via the + icon (highlighted with a red circle in the image below)

Handling an Incident:
Click on the selected incident, then tap the pen icon. This will allow you to edit the incident.

Continuing to Handle an Incident:
-
Update the status of the incident..
-
Depending on the status you select, different fields will appear.
-
As shown in the image below, specific fields are displayed based on the chosen status.
-
-
Fill in the required information in the available fields.
-
Tap Update HSEQ Record to save your changes.
The incident will then be updated with the new status and, if applicable, sent to the next responsible party for further handling.

Related:
Under Related/Relasjon, you will see all associated documents, checklists, and Risk Analyses linked to the given incident..

Tasks
In the Tasks menu, you will find all registered tasks along with their status and revision history.
Here you get an overview of:
-
Who is responsible for the task
-
The status of the task
-
Detailed information about each task (by clicking to open)
-
The ability to edit existing tasks
Functions:
-
Use the search function to find specific tasks
-
Apply advanced filters as needed
-
Create new tasks via the + icon (highlighted with a red circle in the image below)


Handling a Task:
-
Click on the relevant task.
-
Tap the pen icon.
-
You will now have the option to edit the task.
Continuing to Handle a Task:
When you open a task for further handling, you can:
-
Update the task by modifying the fields
-
Enter a title and description
-
Check the box to mark the task as completed
-
Describe what actions you took to complete the task
-
(Optional) Link the task to an incident using the HSEQ Object field
Tap Update Task to save your changes.
The task will then be updated with its new status.

Related:
Under Related/Relasjon, you will see all associated documents, checklists, and Risk Analyses linked to the given task.
Checklist
In the Checklist menu, you will find all available checklists.
Here you get an overview of:
-
Which processes the checklist belongs to
-
How many checklists have been completed for each item
-
Fully completed checklists (which can be opened directly)
Functions:
-
Checklists are also accessible under the Processes menu, allowing you to retrieve them directly from the process you are working on.
-
Users can edit existing checklists or create entirely new ones.
Creating Checklists:
-
Top + icon (red circle) → Create a completely new checklist
-
Bottom + icon (oval red circle) → Use a predefined checklist
Search and Filtering:
-
Use the search function to find specific checklists or apply advanced filters as needed
Upcoming Features:
-
It will soon be possible to download each checklist as a PDF
-
When you assign a checklist to a user, it will appear on their Home page

Filling Out a Checklist:
-
Tap the + icon as shown in the image above (Create Checklist Record).
-
Fill out the following:
-
Title
-
Process (link the checklist to the correct process)
-
User (assign the checklist to the correct person)
-
Comment (optional)
-
Execution Date
-
Complete the fields within the checklist itself
-
-
Check the Completed box when the checklist is finished.
-
Tap Update Checklist Record to save.

Risk and Opportunity Assessment
In the Risk and Opportunity Assessment menu, you will find all registered risks and opportunities, along with their associated processes.
Here you get an overview of:
-
Risks and opportunities identified within the organization
-
Processes linked to each risk or opportunity
-
Assessment of the risk or opportunity level, allowing you to quickly see which areas require attention
Functions:
-
Click on a risk or opportunity to view details, edit the assessment, or update actions
-
Use the search function to find specific risks or opportunities
-
Apply filters to sort by process, risk level, or opportunity level
-
Create new risks or opportunities via the + icon
This tool provides a consolidated overview, making it easier to prioritize actions, follow up on high risks, and effectively leverage identified opportunities.


Flowcharts
In the Flowcharts menu, you will find all created flowcharts linked to a process.
Here you get an overview of:
-
Which flowcharts apply to the selected process
-
A description of the workflow
Functions:
-
Click on a flowchart to view details or edit it
-
Create new flowcharts via the + icon
-
Use the search function or filters to find specific flowcharts
This provides an easy way to visualize processes and ensure that everyone follows the correct workflow.


Settings
Click the gear icon to access Settings. This function is available only to Administrators within your organization. Separate training will be provided for users with this role.
In Settings, you can manage:
-
User creation
-
Organization
-
Departments
-
Roles
-
Access control
-
Signatures
-
Notification rules
-
Locations
-
Translations
-
Risk
-
Checklist items
This gives the administrator full control over the system’s structure, access, and settings.

